
If you are a card-maker like me, you probably have tons of stamps and dies and love to make creative cards that stand out. Sometimes it’s nice to change up the card base to add a little more interest to your cards.
Here are a few ideas for easy and fun card folds that will still fit in a standards A2 size envelope. Keep in mind, an A2 card size is typically 4 1/4 inches by 5 1/2 inches. You can either have a top folding card or a side folding card depending on how you cut and score them. The top folding card measures 11 inches by 4 1/4 inches and is scored at 5 1/2 inches. The side folding card measures 8 1/2 inches by 5 1/2 inches and is scored at 4 1/4 inches. For all of the examples below, I will post a blank card and a finished card so you can get a better idea of how this works.


Let’s start with an easy card base called the gatefold card. Gatefold cards are simple because they are basically a standard A2 card with a few extra score lines so that they open in the center rather than on the side or from the bottom. They are often decorated with die cuts that overlap the center fold and can be adorned with a belly band or ribbon to hold them closed. Below, the taller card measures 8 1/2 by 5 1/2 inches and is scored at 2 1/8 and 6 3/8 inches. The shorter card measures 11 by 4 1/4 inches and is scored at 2 3/4 and 8 1/4 inches.


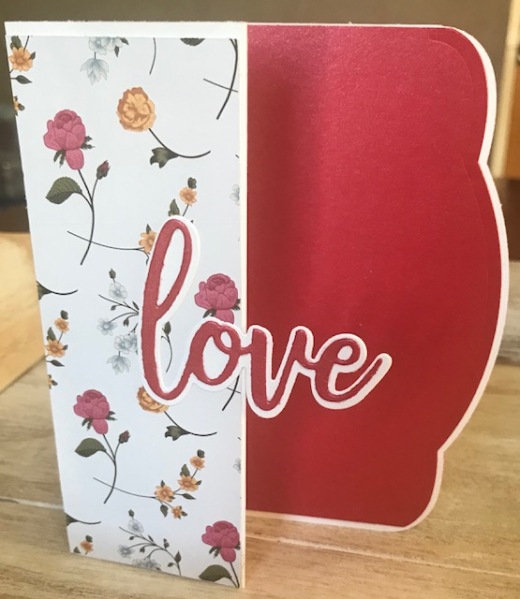
For the longest time I had been intimidated by the idea of making easel cards. Now that I know how easy they are, I make them quite often. Easel cards require 2 card pieces – the card base which becomes the easel and the top facing card. If you want to make a wider easel card, start with a standard side fold A2 card (see above for measurements) and score at 2 1/8 and 4 1/4 inches. You will also need a card face that is 5 1/2 by 4 1/4 inches. Glue only the 2 1/8 inch section and adhere the face card as shown. The card will easily fold flat once assembled. For the taller easel card you would follow the same instructions but start with a top folding A2 size card (see measurements above) and score at 2 3/4 and 5 1/2 inches. You will also need a card face that is 5 1/2 by 4 1/4 inches that will get glued to the 2 3/4 inch section. The easel cards work best if a “stopper” is placed on the base so that once the card is standing upright, the stopper will help to position the face card so it doesn’t slide around. You can really use anything for the stopper. I have used die cuts that I pop up with foam, buttons, enamel dots, ribbon, etc. Any type of embellishment that has a little bit of height should work just fine.


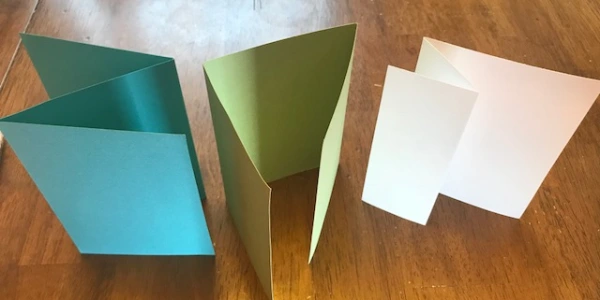
The next type of card I want to introduce you to are the Z fold cards. Jennifer McGuire recently put together a great video that shows how to decorate these cards as well as how to partially cut into them with dies. Please check out Jennifer’s video if you want to learn more. The basic Z fold cards are sometimes called accordion cards, C fold cards, or engineering cards. The difference is where they are scored and how they are folded. So in the examples below, the first card is 12 by 5 1/2 inches and scored at 4 and 8 inches. It is folded in a Z or accordion fashion (hence the name). The next card has the same exact measurements and scoring lines, but is folded in a different order. When opened, from the top it has a C shape so it is referred to as a C fold card. The last example is a standard A2 side folding card, however, the front flap is scored at 2 1/8 and folded back which makes a small Z looking from the top. Again decorating with dies that overlap the front panel is common or inserting a fancy edged paper to the inside adds interest too.
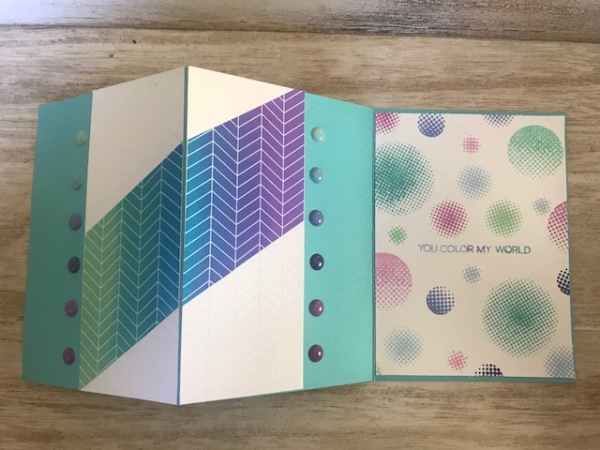

One of my favorite Z fold cards is the double Z fold. As you may have guessed from the name, you will need two card pieces to complete this card. First cut a piece of paper to measure 11 by 4 1/4 and score at 2 3/4 and 5 1/2 inches. For the second piece, you want to cut the paper to measure 11 by 1 1/2 inches and score at 5 1/2 and 8 1/4 inches. Glue only the first and last sections of the thinner strip to your base card as shown below. Be careful where you glue or this can affect how your card folds flat. You can also play around with different measurements if you want to make taller or wider cards or even if you want to make a thicker band. I have seen some really creative shapes used for the band like making them into grass or a long fence to match the style of the card.


The last set of cards I want to show you are a little more difficult, but they are so much fun. These types of cards are called K cards or pop-out cards. Basically, you can cut out any image in the pop-out area and even hang things with string or wire or ribbon to make it even more interactive. For the first piece of the card (the back when opened), start with a standard A2 side fold or top fold card base. Cut a second card the same size but score at the 1/4, 1/2 and 3/4 positions. This will create the pop-out. As you can see from the pictures, you can cut any shape into the center or pop-out as long as it is symmetrical (or else it is even harder to cut and fold. You can even create multiple cards and glue them back to back to make some spectacular projects. Sara Davies, from Crafter’s Companion, has some excellent examples on her site and on YouTube.


I hope you have enjoyed taking a peek into different A2 card bases. There are so many more styles to try once you have mastered these. You can always look on pinterest or google card bases to find additional styles. Please share your creations – I would love to see how you have decorated each of them! Happy Crafting!!

These are all fantastic! Great tutorial, thanks for sharing!!!
LikeLiked by 1 person
Thanks for putting this post together especially for the z cards, I always get thrown off on the main fold. I like to use this design for mini album pages!
LikeLiked by 1 person